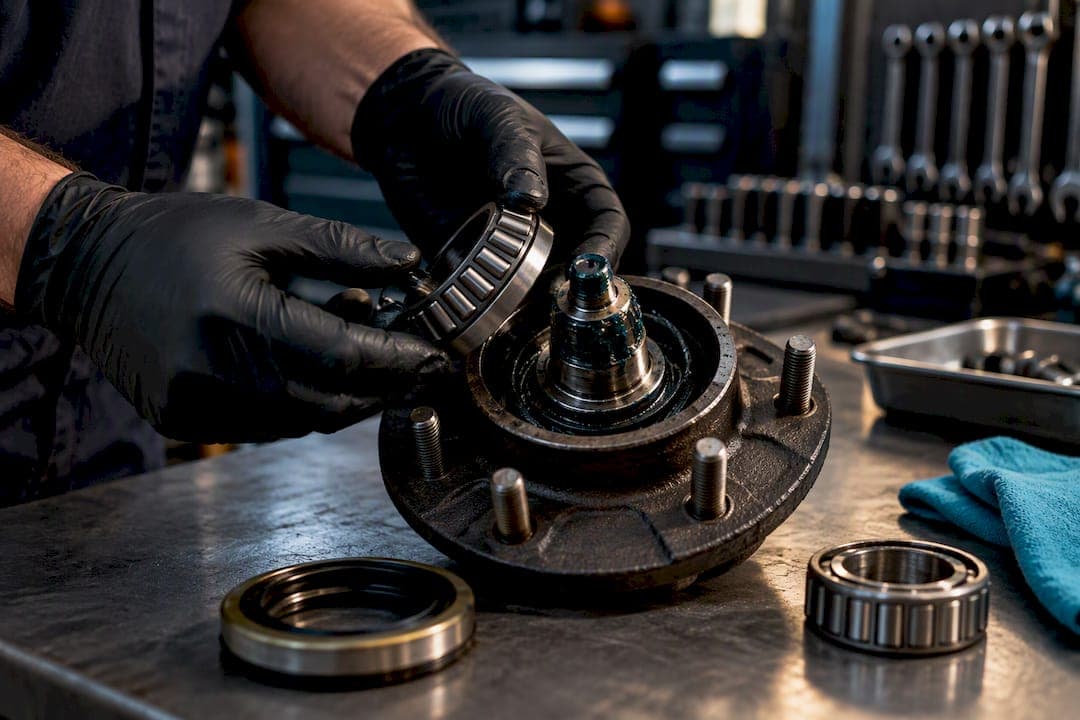
Repack or Replace: Trailer Wheel Bearing Service for Owners

If your trailer bearings are due, repack them every 12 months or 12,000 miles as routine maintenance, or sooner if the trailer has been submerged in water, according to etrailer’s service guidance. If you hear grinding, feel heat at the hub, or find gritty or watery grease, stop towing and replace the bearings and races rather than repacking. A professional repair shop can inspect and quote the job the same day if you’d rather not do it yourself.
TL;DR:
- Repack trailer bearings every 12 months or 12,000 miles, or sooner if the trailer has been submerged in water, to prevent failure.
- Use proper tools, fresh seals, cotter pins, and marine-grade grease, and confirm bearing sizes before purchasing replacement parts.
- Ensure correct bearing preload through a sequence of tightening, backing off, and checking end play within 0.001 to 0.005 inches, rather than relying solely on torque.
- Replace bearings, races, and seals if inspection reveals pitting, scoring, discoloration, roughness, or water contamination in grease.
- Boat trailers need more frequent service, use waterproof grease, and replace seals routinely due to water ingress during launching.
Table of Contents
- What tools, parts, and grease to gather before you start
- Step-by-step trailer bearing repack from start to finish
- Inspection checklist: signs your bearings need replacing, not repacking
- How often to service and what it costs, DIY vs. a shop
- Why boat trailers need a different maintenance schedule
- Common problems, roadside checks, and safety while you work
- A shop’s-eye view on trailer bearing service
- Getting your trailer bearings serviced at Chapman’s
- Sources
- FAQ
What tools, parts, and grease to gather before you start
A trailer bearing repack goes faster and safer when everything is laid out before you jack up the axle. Half the frustration owners run into mid-job comes from missing a seal size or grabbing the wrong grease, so a quick inventory check saves a trip to the parts store with grease on your hands.

You’ll need rated jack stands (never just a jack), a socket set matching your lug nuts and spindle nut, a torque wrench, a seal driver or a socket close to the seal’s outer diameter, and either a bearing packer tool or clean hands for manual packing. For parts, buy new grease seals and cotter pins for every hub you service. Both are destroyed during removal and are your first line of defense against water and dirt getting into the bearing, according to Loyal Axles’ repack guide. Grab fresh dust caps if the old ones are dented or hard to seat, and use NLGI #2 grease, choosing a marine-grade formula if the trailer ever sees water.
Before you buy anything, confirm the exact bearing numbers stamped on the old bearings or measure the hub bore and spindle diameter if the stamps are worn away. Bearing sizes vary by axle rating, and a close-but-wrong fit will wear out fast or won’t seat correctly at all.
- Jack stands rated for your trailer’s weight, plus wheel chocks
- Torque wrench, socket set, and a seal driver or matching socket
- Bearing packer (optional) or clean nitrile gloves for hand packing
- New seals, new cotter pins, and NLGI #2 grease (marine-grade for boat trailers)
- Solvent, a stiff brush, and clean rags for cleaning the hub and spindle
Pro Tip: Bring your old bearing or the full hub assembly to a parts counter or to Chapman’s so the correct kit gets matched the first time, rather than guessing from a catalog number.
Step-by-step trailer bearing repack from start to finish
Doing this correctly means working through the same sequence every time: support the trailer safely, disassemble without losing track of parts, clean and judge what you’re looking at, pack and seat the bearings, then set preload before you ever tow again. Skipping the preload step is the single most common reason a fresh repack fails within a few hundred miles.
- Chock the wheels on the opposite side of the trailer, loosen the lug nuts slightly, then lift the axle with a jack and set it on rated jack stands before removing the wheel.
- Pry off the dust cap, straighten and remove the cotter pin, and take off the castle nut and washer, keeping small parts together in a labeled container.
- Pull the hub straight off the spindle. The outer bearing usually falls free; the inner bearing and seal come out with the hub, so plan to destroy the old seal on removal.
- Keep the inner and outer bearings separate and note which faced which direction. They are matched to specific races pressed into the hub and are not interchangeable side to side.
- Wash the bearings, hub interior, and spindle in solvent, then dry and inspect the races and rollers under good light for pitting, scoring, rust, or blue and black heat discoloration.
- If races show any wear, drive them out of the hub and press in new ones matched to the new bearing set. Races and bearings are always replaced together as a set.
- Pack each bearing by hand, working grease fully into every roller gap and around the cage, or use a mechanical bearing packer for a faster, equally thorough result.
- Apply a thin layer of grease to the hub cavity, but do not overfill it. Excess grease has nowhere to go and can push past the seal under heat, according to Timken’s trailer bearing guidance.
- Seat the new seal squarely with a seal driver, lip facing the grease cavity, tapping evenly around the perimeter so it doesn’t cock sideways in the bore.
- Slide the hub back onto the spindle, install the outer bearing, washer, and castle nut, then set preload before you go any further.
- Tighten the castle nut while rotating the hub to seat the bearings, back the nut off a full turn, re-torque to a moderate value, then back off again by a sixth to a quarter turn.
- Check bearing end play with a dial indicator if you have one, targeting the 0.001 to 0.005 inch range Timken specifies, then install a new cotter pin, the dust cap, and torque the lug nuts to your trailer’s spec.
The bearing end play target is 0.001 to 0.005 inches, measured with a dial indicator after the seat, back-off, and re-torque sequence, according to Timken, and this narrow window, not a fixed torque number, is what actually determines whether the bearing runs cool or cooks itself on the highway.
Much DIY repacks fail early because the installer torques the nut to a number and stops, rather than measuring end play directly, according to Loyal Axles. If you don’t own a dial indicator, the seat, back-off, and light re-torque sequence still gets you close, but a hub that feels tight with no perceptible play, and no looseness you can rock by hand, is your fallback check. Take a short test drive afterward, then stop and feel each hub. Warm is normal; too hot to touch is not.
Inspection checklist: signs your bearings need replacing, not repacking
Not every hub that comes apart needs new bearings. But guessing wrong in the direction of reusing worn parts is how a $30 repack turns into a roadside breakdown. A few objective checks tell you which one you’re dealing with.

Visual inspection comes first. Look for pitting or scoring on the rollers and races, any rust, and blue or black discoloration that signals the bearing ran hot at some point. Check the old seal for cracks, hardening, or a torn lip, all of which mean it was no longer keeping water and grit out.
Functional checks matter just as much. Spin each bearing by hand after cleaning: it should roll smoothly with no roughness or notchy feel. With the hub reinstalled but before final torque, rock it at the 12 and 6 o’clock positions to feel for play beyond a slight amount, and after a test drive, check hub temperature by hand at each wheel.
- Pitting, scoring, rust, or heat discoloration on rollers or races means replace the full bearing and race set.
- A rough, notchy, or gritty feel when spinning the bearing by hand rules out reuse.
- Excessive rock or play at the hub after reassembly means the bearing, race, or spindle is worn beyond adjustment.
- A cracked, hardened, or torn seal is replaced every time regardless of bearing condition, along with the cotter pin.
- Watery, dark, or gritty grease means contamination has already reached the bearing, according to Loyal Axles, and the bearing and race should be replaced rather than repacked.
Never spin a bearing with compressed air to dry or check it. The rollers or cage can eject with enough force to cause injury, according to Timken. If a trailer has been launched into water, treat that as an automatic inspection trigger even if nothing looks wrong from outside.
How often to service and what it costs, DIY vs. a shop
Trailer bearings on a standard utility or cargo trailer should be inspected and repacked every 12 months or 12,000 miles, whichever comes first, according to etrailer. Boat trailers, frequently loaded trailers, and anything used commercially need attention more often, since water exposure and heavier loads shorten the interval considerably.
Cost depends heavily on whether you do the work yourself or hand it to a shop, and on how much wear you find once the hub is open.
| Service scenario | Typical cost | Time (per hub) |
|---|---|---|
| DIY repack, parts only | $15 to $40 per hub | 1 to 2 hours |
| Shop repack, per axle | $100 to $250 | Same-day at most shops |
| Full bearing/race/seal replacement, per axle | $200 to $500 or more | Varies with corrosion |
These figures come from One and Done Prep’s 2026 cost breakdown, and the spread within each range mostly comes down to bearing size, axle type, whether races need pressing out, and how much corrosion has to be dealt with before reassembly. A trailer with disc brakes or heavily rusted hardware will run longer and cost more than a simple drum setup in good condition.
If you’d rather have a shop handle it, ask for an itemized written estimate before work starts so you know exactly what’s parts, what’s labor, and whether the quote assumes a repack or a full replacement. Chapman’s auto repair cost guide breaks down typical service pricing, and every visit includes a free digital inspection with photos before anything is approved.
Pro Tip: Ask any shop whether their quote includes new seals and cotter pins by default. Some estimates price the bearings alone and add seals as a separate line once the hub is already apart.
Why boat trailers need a different maintenance schedule
Boat trailers fail differently than utility trailers because launching draws water past the seal every single time, even when nothing looks wrong on the outside. That water works its way into the bearing cavity and starts corroding the races and rollers well before you’d notice a symptom at the hub.
Because of this, boat trailer bearings should be repacked with marine-grade waterproof grease, not standard NLGI #2 lithium grease, and the seals should be replaced at every service rather than reused, according to Loyal Axles. A practical schedule is once at the start of boating season, once at the end, and again immediately after any launch where the hub went fully underwater.
- Use marine-grade, waterproof NLGI #2 grease rather than standard lithium grease.
- Replace seals every service, not just when they visibly fail.
- Repack at the start and end of the season, plus after any submerged launch.
- Check old grease for a watery or gritty texture, a clear sign water already got in.
- Consider hub covers or bearing protectors during storage to reduce moisture exposure between trips.
Common problems, roadside checks, and safety while you work
A bearing that’s about to fail rarely does so quietly. Knowing the warning signs, and what to do the moment you notice one, keeps a bad bearing from turning into a lost wheel on the highway.
- Grinding or growling noise from a hub means the bearing is already damaged. Slow down, find a safe place to stop, and check hub temperature by hand before continuing.
- A hub too hot to touch after driving, wobble you can feel through the trailer, or grease visibly leaking past the seal all mean stop towing and inspect before going further.
- At a safe stop, spin each wheel by hand if you can lift the trailer. Roughness, noise, or a wheel that won’t spin freely confirms the problem is at that hub.
- Get to a shop rather than continuing on a highway trip once any of these signs shows up. A bearing that seizes at speed can cause the wheel to separate from the hub.
In the garage, always support the trailer on rated jack stands, never on a jack alone. Skip compressed air on bearings entirely, and avoid using an impact wrench for the final preload adjustment. That step needs a controlled torque wrench and, ideally, a dial indicator, not brute force.
Pro Tip: If you can’t get a stable end play reading, or the bearing feels contaminated with brake dust or metal shavings, that’s the point to call a shop rather than guess.
A shop’s-eye view on trailer bearing service
A family-owned shop in Craig, Colorado, has handled trailer and RV work alongside general auto and diesel repair for many years. Trailers brought in get a digital inspection with photos before any repair is approved, so owners see what’s worn and what isn’t.
Most DIY repacks go fine. Owners tend to call a shop when the hub shows race damage that requires pressing, when brake components are contaminated with grease, or when they can’t get a confident end play reading and don’t want to guess. Same-day diagnostics, loaner vehicles during the work, and a warranty can make that call an easier one.
— J.B. Chapman
Getting your trailer bearings serviced at Chapman’s
Skipping a repack to save an afternoon costs a lot more once a bearing seizes on the road, and that’s the trade Chapman’s trailer and RV repair service is built to avoid. Bring the trailer in and a technician inspects the hubs, photographs anything worn, and gives you a written estimate before touching a bolt, so you know whether you’re looking at a straightforward repack or a full bearing and race replacement.

A trailer and RV bearing appointment covers the inspection, correctly matched parts, labor, and a five-year, 50,000-mile warranty on the work. Same-day service and a free loaner car are available if the trailer needs to stay overnight.
- Free digital inspection with photos before any work is approved
- Written estimate so you know the cost before you commit
- Same-day diagnostics and repairs on most trailer and RV jobs
- Five-year, 50,000-mile warranty backing the repair
Call Chapman’s or request a written estimate and get your trailer’s bearings checked before your next tow.
Sources
- Trailer Wheel Bearing Inspection, Maintenance and Replacement | Timken
- Replacing the Bearing, Races and Seals on a Trailer Hub | etrailer
- How to Repack Trailer Wheel Bearings: Step-by-Step Guide | Loyal Axles
- Cost Guide for Repacking Trailer Bearings 2026 – One and Done Prep
FAQ
How often should trailer wheel bearings be serviced?
Most trailers need a bearing inspection and repack every 12 months or 12,000 miles, whichever comes first, according to etrailer. Boat trailers and trailers used heavily or exposed to water should be serviced more often, including immediately after any submerged launch.
How much does it cost to change wheel bearings on a trailer?
A full bearing, race, and seal replacement typically runs $200 to $500 or more per axle, depending on parts and labor, according to One and Done Prep’s cost data. Corrosion, axle type, and whether the races need pressing out all push the price toward the higher end.
How do you service wheel bearings on a trailer?
You remove the hub, clean and inspect the bearings and races, pack fresh grease into the bearings by hand or with a packer tool, install a new seal, and reassemble while setting end play to 0.001 to 0.005 inches with a dial indicator, according to Timken. New cotter pins and seals go in every time regardless of bearing condition.
How much does it cost to repack trailer wheel bearings?
DIY parts for a repack, including grease and a new seal, typically run $15 to $40 per hub, while a shop repack usually costs $100 to $250 per axle, according to One and Done Prep. The difference mainly reflects labor and any parts a shop finds worn during inspection.
Recommended
Questions about your vehicle?
Chapman's Automotive is in Craig, CO — serving the Yampa Valley. Call 970-550-2883 or book online and we'll take a look.